Executing an Elastic MapReduce Hive Workflow from the AWS Management Console
Contents:
- Background
- Using AWS’ Contextual Advertising Hive Sample to Create a feature_index File
- Creating an Interactive Hadoop on Azure Hive Table from Amazon’s feature_index File
••• Update 6/4/2012: Updated the estimated cost of running the workflow by adding the EMR surcharge of $0.015/hour for a small instance.
•• Update 6/2/2012: Microsoft’s Brad Sarsfield (@bradooop), Senior Developer - Hadoop for Windows and Windows Azure, reported in an answer to my “What Hive Version Does HadoopOnAzure Use? thread in the HadoopOnAzure Yahoo! Group:
We will be moving the preview to use Hive 0.8.1 very soon, weeks not months. We've been working on this as part of a larger version bump that includes a core update of Hadoop to the 1.0.x codeline.
Some of you have noticed that we have pushed a set of patches back into Hadoop core recently. We're really excited to see that the patches are flowing and are starting to get committed.
For those of you who are using the Hadoop for Windows preview, which is currently in a limited invite only preview, a refresh MSI will come in a similar timeframe.
Brad Sarsfield
In an earlier tweet Brad reported that the Apache Hadoop on Windows Azure preview runs Apache Hive 0.7.1.
• Update 5/31/2012: Amazon Web Services reported in an e-mail this morning:
Announcing Amazon EMR Support for Hive 0.8.1
We are excited to announce the availability of Hive 0.8.1 on Amazon Elastic MapReduce. This introduces a number of important new features to Hive such as binary and timestamp data types, export/import functionality, a plug-in developer kit, support for per partition SerDes, and the ability to debug Hive remotely. For more information, please visit the Hive Version Details page in the EMR Developer Guide.
Background
Amazon Web Services (AWS) introduced its Elastic MapReduce (EMR) feature with an Announcing Amazon Elastic MapReduce post by Jeff Barr on April 2, 2009:
Today we are introducing Amazon Elastic MapReduce , our new Hadoop-based processing service. I'll spend a few minutes talking about the generic MapReduce concept and then I'll dive in to the details of this exciting new service.
Over the past 3 or 4 years, scientists, researchers, and commercial developers have recognized and embraced the MapReduce programming model. Originally described in a landmark paper, the MapReduce model is ideal for processing large data sets on a cluster of processors. It is easy to scale up a MapReduce application to jobs of arbitrary size by simply adding more compute power. Here's a very simple overview of the data flow in a typical MapReduce job:
Given that you have enough computing hardware, MapReduce takes care of splitting up the input data into chunks of more or less equal size, spinning up a number of processing instances for the map phase (which must, by definition, be something that can be broken down into independent, parallelizable work units) apportioning the data to each of the mappers, tracking the status of each mapper, routing the map results to the reduce phase, and finally shutting down the mappers and the reducers when the work has been done. It is easy to scale up MapReduce to handle bigger jobs or to produce results in a shorter time by simply running the job on a larger cluster.
Hadoop is an open source implementation of the MapReduce programming model. If you've got the hardware, you can follow the directions in the Hadoop Cluster Setup documentation and, with some luck, be up and running before too long. …
The following three earlier OakLeaf posts cover the Microsoft SQL Server team’s Apache Hadoop on Windows Azure (a.k.a., HadoopOnAzure) preview:
- Importing Windows Azure Marketplace DataMarket DataSets to Apache Hadoop on Windows Azure’s Hive Databases (4/2/2012)
- Using Data from Windows Azure Blobs with Apache Hadoop on Windows Azure CTP (4/6/2012)
- Using Excel 2010 and the Hive ODBC Driver to Visualize Hive Data Sources in Apache Hadoop on Windows Azure (4/14/2012)
This tutorial assumes that you have an AWS account and are familiar with the AWS Management Console, but doesn’t assume any prior knowledge of Apache Hadoop, MapReduce or Hive.
Using AWS’ Contextual Advertising Hive Sample to Create a feature_index File
Contextual Advertising is the name of AWS’ Apache Hive sample application. Amazon’s Contextual Advertising using Apache Hive and Amazon EMR article of 9/25/2009, last updated 2/15/2012, describes the sample app’s scenario as follows:
An internet advertising company operates a data warehouse using Hive and Amazon Elastic MapReduce. This company runs machines in Amazon EC2 that serve advertising impressions and redirect clicks to the advertised sites. The machines running in Amazon EC2 store each impression and click in log files pushed to Amazon S3.
Storing Logs on Amazon S3
The ad serving machines produce two types of log files: impression logs and click logs. Every time we display an advertisement to a customer, we add an entry to the impression log. Every time a customer clicks on an advertisement, we add an entry to the click log.
Every five minutes the ad serving machines push a log file containing the latest set of logs to Amazon S3. This allows us to produce timely analyses of the logs. See the following article on monitoring the health of ad serving programs: http://aws.amazon.com/articles/2854.
The ad server machines push their impression logs into Amazon S3. For example:
  s3://elasticmapreduce/samples/hive-ads/tables/impressions/
  dt=2009-04-13-08-05/ec2-12-64-12-12.amazon.com-2009-04-13-08-05.log

We put the log data in the elasticmapreduce bucket and include it in a subdirectory called tables/impressions. The impressions directory contains additional directories named such that we can access the data as a partitioned table within Hive. The naming syntax is [Partition column]=[Partition value]. For example: dt=2009-04-13-05.
Launching a Development Job Flow
Our first task is to combine the click and impression logs into a single table that specifies if there was a click for a specific ad and information about that click.
Before we create a table, let's start an interactive job flow so that we can enter our Hive commands one at a time to test that they work. After we verify the Hive commands, we can use them to create a script, store the script on Amazon S3, and create a job flow that executes the script.
There are two ways to start an interactive job flow. You can either use the Amazon Elastic MapReduce command line interface available at http://aws.amazon.com/developertools/2264 or you can use the AWS Management Console available at http://console.aws.amazon.com.
This tutorial uses the AWS Management Console.
Creating an S3 Bucket to Hold the Hive App’s feature_index Output File(s)
1. Navigate to http://console.aws.amazon.com, click the Management Console’s S3 tab to open the Buckets page, select Create Bucket in the Actions list to open the form of the same name, type a name for the bucket and select the region closest to you:
2. Click Create to create the bucket, close the form and click the Elastic MapReduce tab.
Sign Up for an EMR Account, if Necessary
3. If you haven’t done so previously, you’ll be requested to sign up for an EMR account:
4A. Click the Sign Up for Elastic MapReduce button to open the Identity Verification by Telephone page, type a phone number to which you have immediate access, phone number, and click continue.
4B. In usually less than a minute, a robocaller will request you to text or say a four-digit verification code that appears in step 2. If correct, step 3 will display as shown here:
4C. Click Continue to display the Updating Your Account page:
5. When the e-mail arrives, follow its instructions to return to the Management Console’s EMR home page:
Add the feature_index File to the Bucket with a Hive Query
6. Select the same region you select for the S3 bucket to host the project, and click the Create New Job Flow button to open the Create a New Job Flow form. Type a Job Flow Name, select Run a Sample Application, and choose Contextual Advertising (Hive Script) from the list:
7. Optionally, click the Learn More link to open the Contextual Advertising using Apache Hive and Amazon EMR tutorial mentioned at the start of this section:
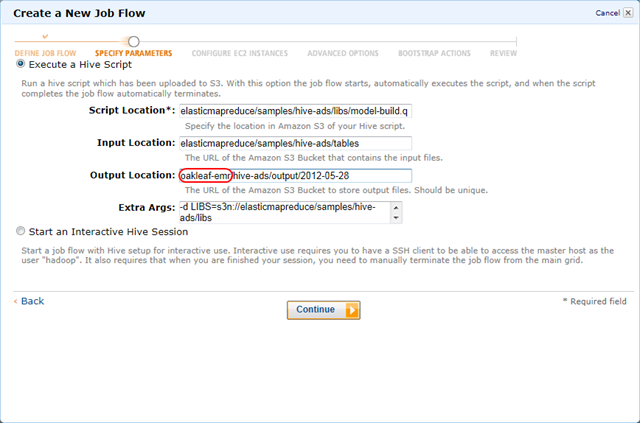
6. Click Continue to return to open the form’s Specify Parameters page with locations for the Hive script, Input data file(s) and Extra Args specified.
7. Replace the <yourbucket> placeholder with the bucket name you specified in step 1:
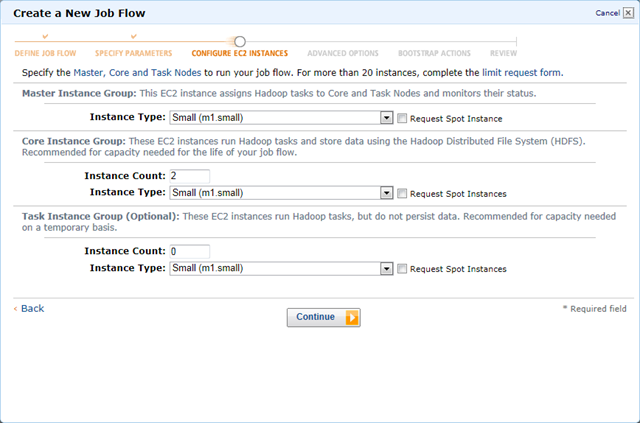
8. Click Continue to open the Configure EC2 Instances page and accept the default values for the Master (1), Core (2) and Task (0) Instance groups:
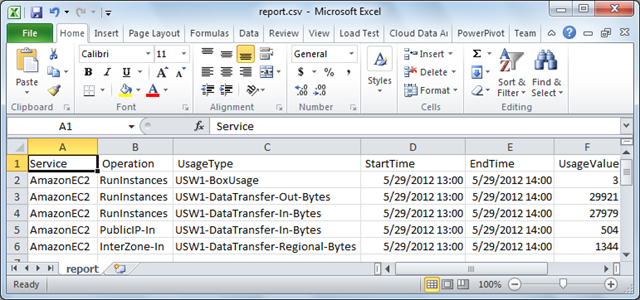
••• Note: If you select the Small instance type, you will be billed for the minimum one hour’s use of three EC2 Linux/UNIX instances = US$0.27 plus a $0.045 MapReduce fee = $0.315 for processing plus a very small amount for data transfer. Selecting the recommended Large instances costs about 4 times more. Following is the usage report for the session described in this article:
Hive operations from the Management Console automatically terminate after saving the final data in S3.
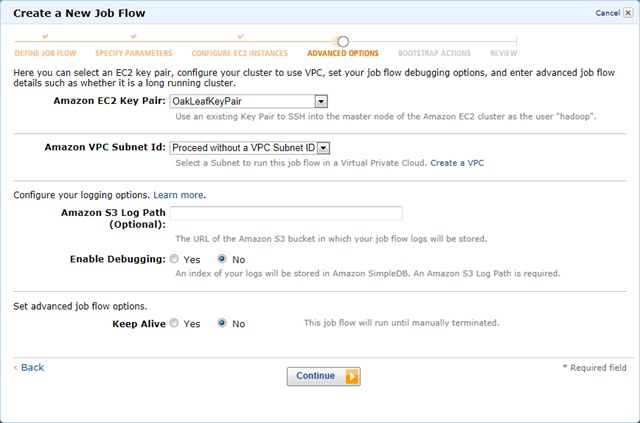
9. Click Continue to open the Advanced Options page. If you want to configure or run jobs from the command line, accept your default (or another) key pairs and the remaining defaults:
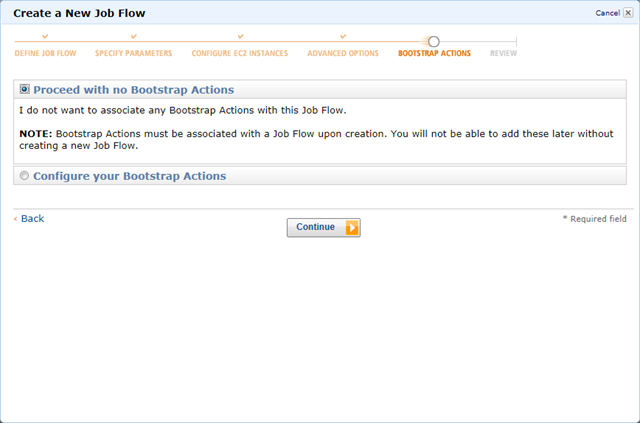
10. Click Continue to open the Bootstrap Actions page and accept the default No Bootstrap Actions option:
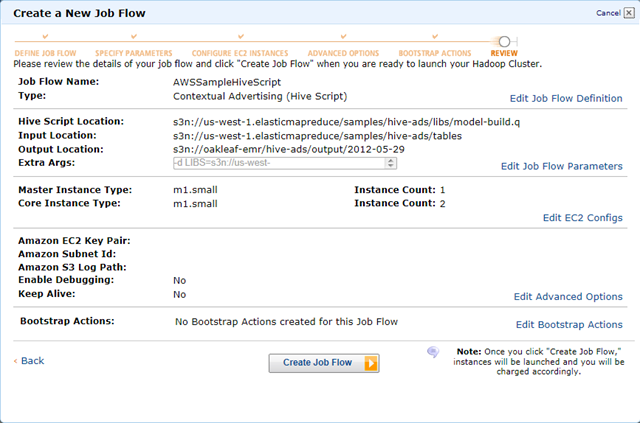
11. Click Continue to open the Review page:
Note: The s3n DNS prefix represents the S3 native (rather than block) file format, which is significant when you use Amazon S3 as the data source for interactive Hive operations with Windows Azure’s Apache Hadoop on Windows Azure preview later in this tutorial.
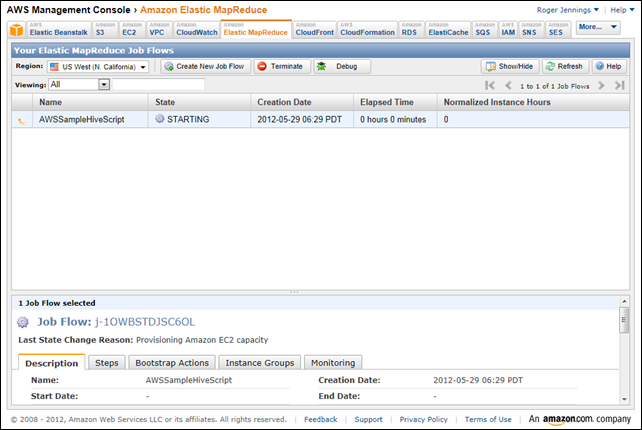
12. Click Create Job Flow to close the form and start the workflow:
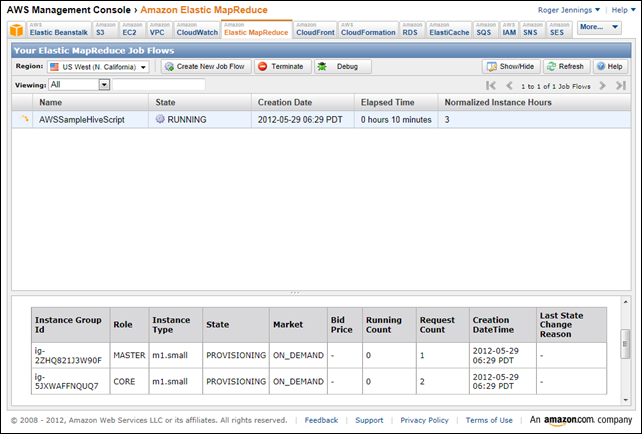
13. After about 10 minutes for provisioning the instances, the State changes to RUNNING:
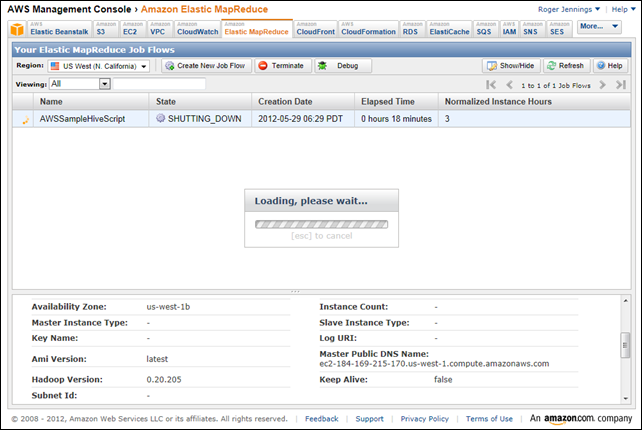
14. After another 8 minutes or so for processing the workflow, the State changes to SHUTTING_DOWN:
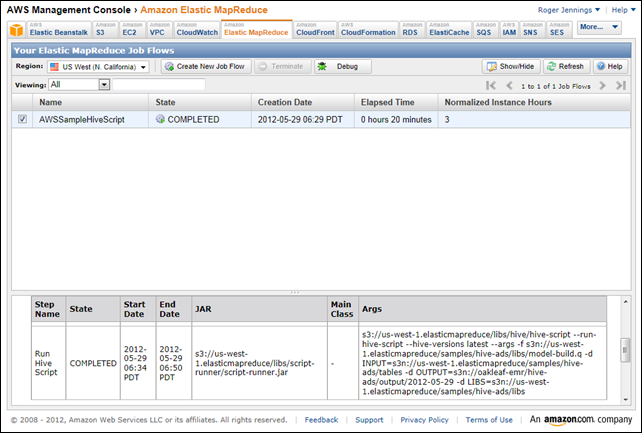
15. After another couple of minutes, the State changes to COMPLETED and the arguments for the Hive operation appear in the Args column of the lower panel:
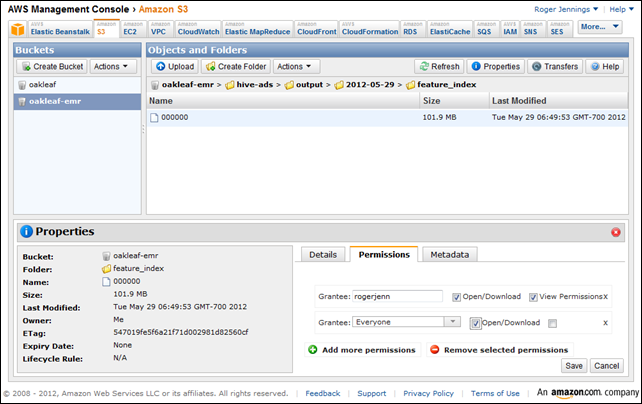
16. Click the S3 tab, select <YourBucket> in the navigation pane, double-click the folder names to navigate to the <YourBucket>/hive-ads/output/<Date>/feature_index folder, click the Properties button and Permissions tab, click Add More Permissions, select Everyone in the Grantee list, and mark the List check box to give public permission to view the file[s] in this folder. Select the select the 00000 file, click Add More Permissions again, select Everyone, and mark the Open/Download check box to give pubic access to the file:
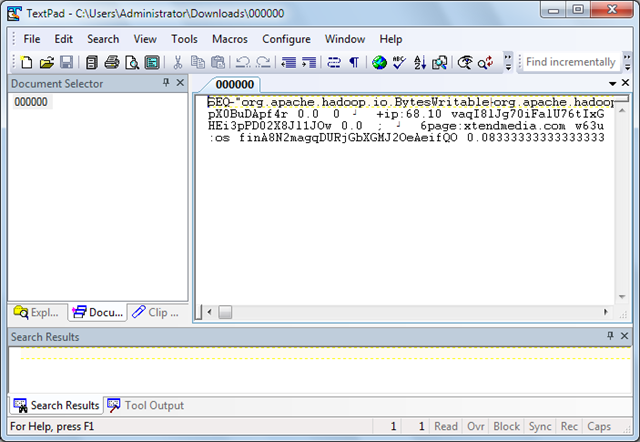
17. Click Save to save your changes. If you have a text file editor that works well with large (~100 MB) files, such as TextPad, double-click the the filename, save it in your Downloads folder and open it with the text editor:
Note: The document’s format is Apache Hadoop SequenceFile, a standard format for Hive tables, uncompressed in this instance. You can import this format into Hive tables with the CREATE EXTERNAL TABLE command having a STORED AS SEQUENCEFILE modifier, as described later in this tutorial.
Creating an Interactive Hadoop on Azure Hive Table from Amazon’s feature_index File
My Using Data from Windows Azure Blobs with Apache Hadoop on Windows Azure CTP tutorial, mentioned earlier, describes how to specify a Windows Azure blob as the data source for an interactive Hive query using the SQL Server team’s HadoopOnAzure preview. This section describes a similar process that substitutes the file you created in the preceding steps as the Hive table’s data source.
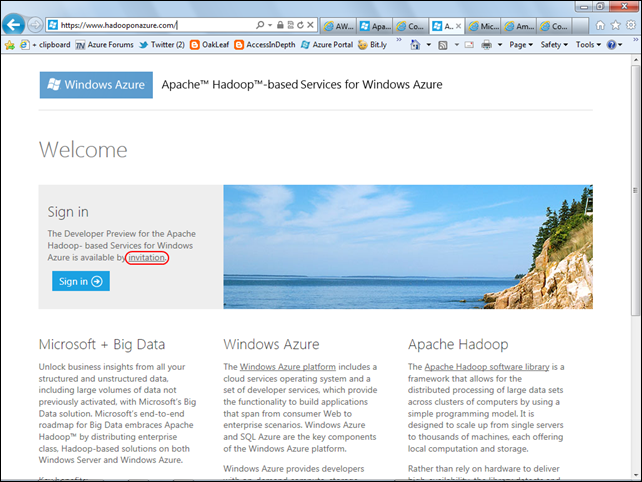
This section assumes you’ve received an invitation to test the Apache Hadoop on Windows Azure preview. If not, go to this landing page, click the invitation link and complete a questionnaire to obtain an invitation code by e-mail:
To set up the S3 data source and execute HiveQL queries interactively, do the following:
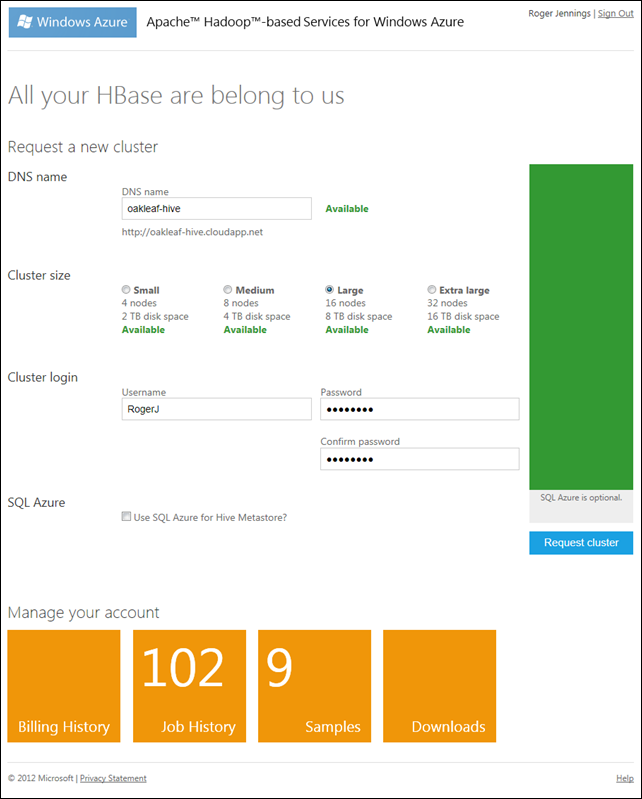
1. Go to the HadoopOnAzure (HoA) landing page, click Sign In, and provide your Live ID and password to open the main HoA page (see step 2), if you have an active cluster, or the Request a Cluster page if you don’t. In this case, type a globally-unique DNS prefix for the cluster, select a Cluster Size, type your administrative login, password and password confirmation:
Note: Passwords must contain upper and lower case letters and numerals. Symbols aren’t allowed. When your password and confirmation passes muster, the Request Cluster button becomes enabled. If a Large cluster is available, choose it. No charges accrue during the preview period.
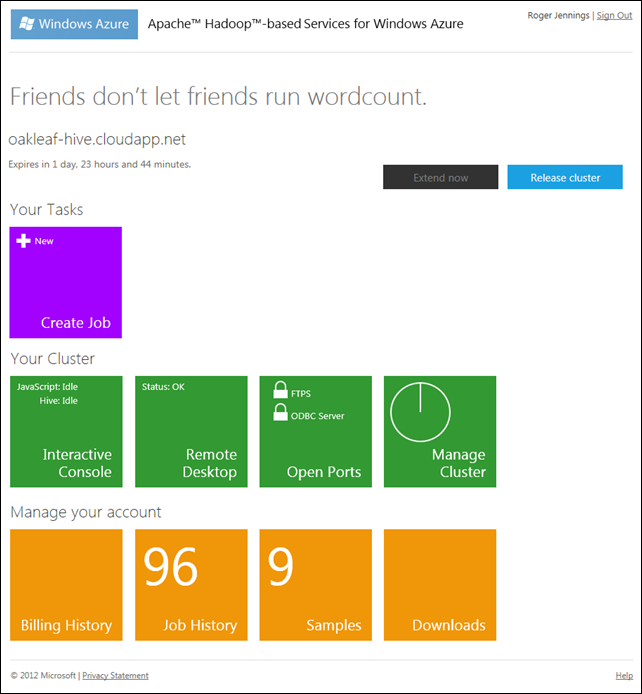
2. Click the Request Cluster button to start provisioning and display its status. After a few minutes the main HoA page opens:
Note: The cluster lifespan is 48 hours; you can renew the cluster during its last six hours of life only. Job History count will be 0, unless you’ve previously complete jobs.
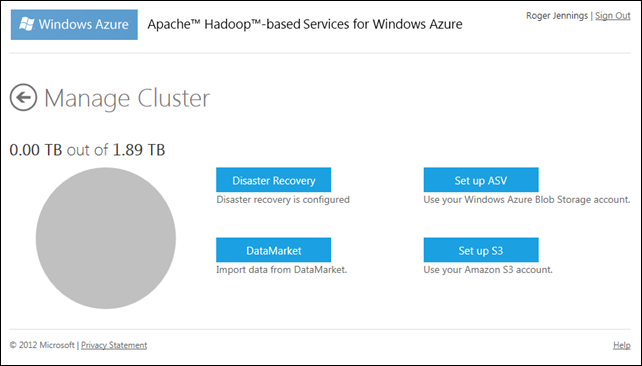
3. Click the Manage Cluster tile to open the page of the same name:
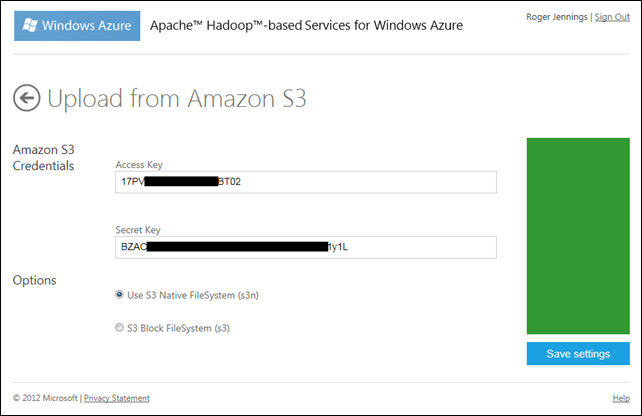
4. Click the Set Up S3 button to open the Upload from Amazon S3 page, type your AWS Access Key and Secret Key, and accept the default S3N Native filesystem:
5. Click Save Settings to display an Amazon S3 Upload Successful message, despite the fact that you haven’t uploaded anything.
6. Click the back arrow twice to return to the main HoA page, click the Interactive Console tile to open the console and click the Hive button to select the Interactive Hive feature.
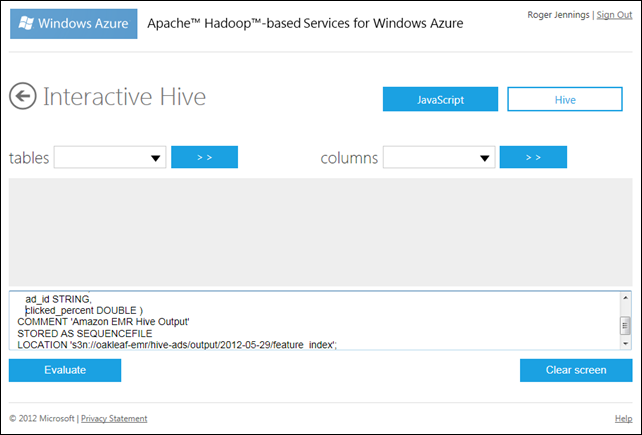
7. Type the following HiveQL DDL query in the text box at the bottom of the page to define the linked table:
CREATE EXTERNAL TABLE feature_index (
feature STRING,
ad_id STRING,
clicked_percent DOUBLE )
COMMENT 'Amazon EMR Hive Output'
STORED AS SEQUENCEFILE
LOCATION 's3n://oakleaf-emr/hive-ads/output/2012-05-29/feature_index';
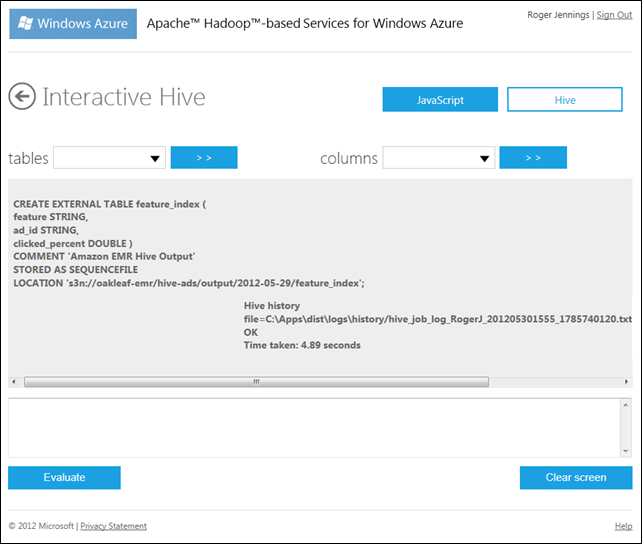
8. Click the Evaluate button to execute the query and create the linked Hive table:
Note: Data isn’t downloaded until you execute a query that returns rows. Executing SELECT COUNT(*) FROM feature_index indicates that the table has 1,750,650 rows.
9. Open the Tables list which displays the table you just created and HoA’s hivesampletable. The Columns list displays a list of the select table’s column names.
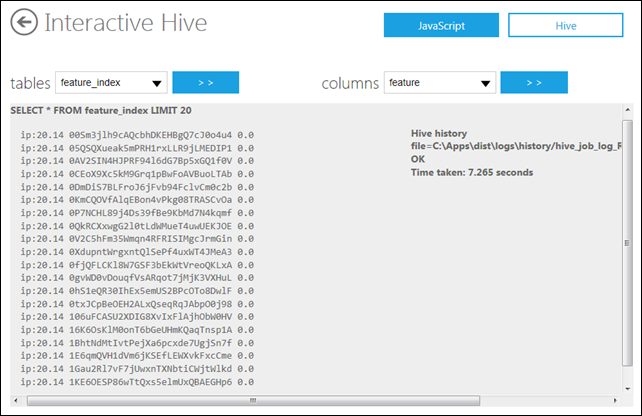
10. To display the first 20 rows of the table, click Clear Screen, and then type and execute the following HiveQL query:
SELECT * FROM feature_index LIMIT 20
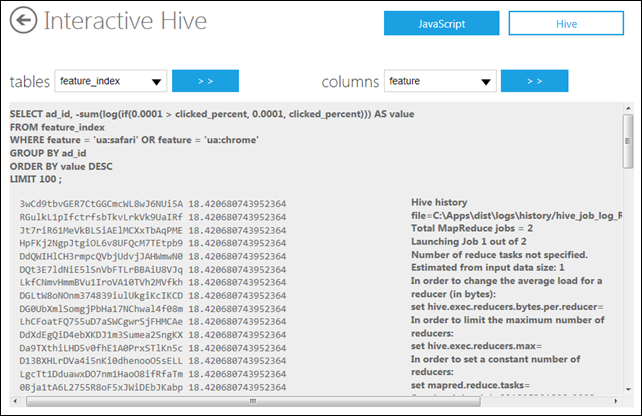
11. The “Applying the Heuristic” section of AWS’ Contextual Advertising using Apache Hive and Amazon EMR article suggests executing the following sample HiveQL query against the feature_index table “to see how it performs for the features 'us:safari' and 'ua:chrome'”:
SELECT ad_id, -sum(log(if(0.0001 > clicked_percent, 0.0001, clicked_percent))) AS value
FROM feature_index
WHERE feature = 'ua:safari' OR feature = 'ua:chrome'
GROUP BY ad_id
ORDER BY value DESC
LIMIT 100 ;
According to the article:
The result is advertisements ordered by a heuristic estimate of the chance of a click. At this point, we could look up the advertisements and see, perhaps, a predominance of advertisements for Apple products.
Note: The original query sorted ascending; sorting descending gives more interesting results (higher chances of a click) first:
Here’s the hidden Hive History’s significant content:
2012-05-30 18:34:58,774 Stage-1 map = 0%, reduce = 0%
2012-05-30 18:35:13,836 Stage-1 map = 1%, reduce = 0%
2012-05-30 18:35:16,852 Stage-1 map = 63%, reduce = 0%
2012-05-30 18:35:19,883 Stage-1 map = 100%, reduce = 0%
2012-05-30 18:35:34,899 Stage-1 map = 100%, reduce = 33%
2012-05-30 18:35:37,930 Stage-1 map = 100%, reduce = 100%
Ended Job = job_201205301808_0002
Launching Job 2 out of 2
Number of reduce tasks determined at compile time: 1
…
2012-05-30 18:36:05,649 Stage-2 map = 0%, reduce = 0%
2012-05-30 18:36:17,664 Stage-2 map = 50%, reduce = 0%
2012-05-30 18:36:20,680 Stage-2 map = 100%, reduce = 0%
2012-05-30 18:36:35,711 Stage-2 map = 100%, reduce = 100%
Ended Job = job_201205301808_0003
OK
Time taken: 133.969 seconds




0 comments:
Post a Comment